Visit our Web Site/ Online Store
Friday, May 30, 2014
How to Make a Fairy Garden
Monday, May 19, 2014
Peafowl Egg. A Rare Treat From a Farming Friend.
Peafowl eggs make a rare, delicious and hearty breakfast.
A family friend retired from her management job here in our area, a few years back, and bought some property on the West side of Michigan.
As a Master Gardener and animal enthusiast, it was only a matter of time before she started to raise and grow food.
Because we have entertained the idea of raising chickens and maybe a few other things ourselves, we have watched carefully, to glean as much information as we could from the things she is doing.
Knowing my fascination with the possibilities of poultry, on a recent visit she brought us, not only a dozen farm fresh eggs, but a peafowl egg as well. I had never tasted peahen eggs and was very excited.
Peafowl eggs are a rare treat, because, unlike chickens, which can lay an egg every day for most of the year, peahens will only lay eggs during a small time window in the spring,and only one egg every other day, so while an average laying hen will produce between 200 and 250 eggs per year, a peahen may produce at most 20 eggs a year, under ideal conditions.
So I was flattered and honored that she was willing to share one of her first eggs of the season with me.
Peahen eggs are considerably larger than chicken eggs. In baking it is recommended that you use one peahen egg to replace 2 chicken eggs.
Another very obvious difference was the thickness of the shell. It took several good solid thwacks ( technical term) on the side of the bowl to get it to break open, while one moderate thwack is enough for a chicken egg.
Once cracked the color and consistency was very similar to the chicken eggs from her farm, (Which of course tend to have have darker yolks than grocery store eggs.)
I opted to fry both the peahen egg and a chicken egg, so I could taste them side by side for comparison.
The peahen egg took quite a bit longer to cook, and had a tendency to stick to the pan a bit more. I suspect there is a chemical difference, quite possibly a higher protein level, or lower fat content, that caused this, but not being a chemist or scientist, I couldn’t say for sure.
The end result was a fried egg, over medium, that was roughly twice the size of the other egg I cooked for comparison.
The taste was very similar. The white of the peahen egg seemed to have a little less flavor than the chicken egg. The yolk seemed to have significantly richer flavor, and almost a sweetness to it. My brain immediately turned to baking. A recipe that calls for egg yolk, for a cheesecake, or even a hollandaise sauce, would logically be much better with peahen eggs, while a meringue or other recipe that just uses the white, would probably not be noticeably different.
It was a fun experiment, a very nice breakfast, and a learning experience.
Thank you Glenda, for sharing a bit of your farm with us!
Saturday, May 3, 2014
Flower Bed on a Budget
When it comes to planting, my focus is generally herbs. They are my passion, and my comfort zone. I know herbs.
But every once in a while, it is fun to step outside the box. Although Herbs are our business, Diann and I are both Advanced Master Gardeners, and we do like to plant other things as well. But for years every inch of ground we had available to us had to be carefully hoarded and allocated, to grow the herbs we needed to make our products, and we only got to squeeze in a bit of flowers here and there. Luckily with the new opportunity available to us with the farm this year, we now get to use some of our own space for other things. So we decided to make ourselves a flower bed.
But just because we are planting something else, there is no reason to go out and spend a ton of money. Diann has been carefully teaching me for years the science of being frugal.
So, I set our to build a flower bed, knowing I was going to do it on a budget. Generally, my projected budget for projects like this is usually zero, then if I have to go over budget by a little we evaluate and adapt as needed.
I started out with some wood that I got on Craigslist recently. Out of Pocket Cost $0.
Then some bricks that my father in law had removed when he built a new walkway at his house. Out of Pocket Cost $0
I traded some work and some of my time for some of the left over soil at the end of planting season at the nursery. Out of Pocket Cost $0 And the cat even helped me load it.
I traded some sunflowers that I had rescued earlier this year and repotted:
for a peony, and added some lillies that were given to us last fall. Out of Pocket Cost $0
So, with a cost of zero, which is within my budget, here is what I came up with.
I scattered some wildflower seeds that came free with a seed order, and some marigold seeds that we got from a friend.
Now we will keep our eyes open for plants on Craigslist, plant exchanges, and places we can barter for plants, and see if we can fill it with color by the time summer gets here.
Thursday, May 1, 2014
10 Thrifty Gardening Tips!
Hi everyone!
We have been gardening on a tight budget for years. Gardening can get expense but, we have learned over these years there are ways to cut costs dramatically.
Here is our Top Ten Thrifty Gardening Tips!
1.) Look for and visit local Plant Swaps
This was one of the first things we did when we decided to install a perennial flower bed. Now our flower bed is so full that we need to thin it out and will take many of the thinned out flowers to our local plant swap to share with others. Garden lovers are very generous people and love to share!
2.) Save your own seeds.
There are some good tutorials out there for saving your own seeds. Check them out and try it out this year. Remember to save your seeds properly so you can use them next season.
3.) Swap Seeds
Once again, gardeners love to share with each other!
4.) Use Newspaper for weed control.
This is not 100% perfect but, it really does help control the weeds. And the newspaper breaks down eventually.
5.) Compost!
Compost all year long for great soil the following season. You don’t have to have a huge compost area. You can do something as small as a large storage container or trash can.
6.) Watch for free gardening materials
This is a picture of a recent haul of free wood. It was listed on Craigslist. We have found a lot of freebies via Craigslist or Freecycle. Check both places daily. Also, check out trash day. yes, do a little curbside free shopping. One year we found a bunch of like new potting containers that someone threw out.
7.) Let friends and family know you want to start gardening
Just put the word out. Tell friends, family, co-workers, church members that you are in need of this or that.
Facebook is a great place to ask friends or family if they have something you may be needing for gardening.
8.) Reduce water usage.
Collect rain water. You can use a trash can or any other large container. Use “gray” water from your home. Example: the water from boiling potatoes or pasta.
9.) Learn how to take cuttings
Once again, gardeners are generous and when asked, love to share cuttings. Ask your neighbors or friends for cuttings. Take cuttings from your own plants and create more of them.
10.) Think outside the box
Look for different uses for everyday items. If you want to do some containers for plants, look around your home and see what could work before heading out and buying pots. Also check out Pinterest and other sources online for great thrifty alternatives and ideas.
I hope this helped get you thinking about gardening and how to do it inexpensively.
Do you have any thrifty gardening tips to share?
Thursday, April 3, 2014
Miniature Conifers and Witches Brooms
I recently attended a meeting of the Wyandotte Garden Club, where our guest speaker, John Generaux, from Hidden Lake Gardens, in Tipton Michigan, spoke to us about Miniature Conifers.
Hidden Lake Gardens a 755 acre a botanical Garden and arboretum operated by Michigan State University, hosts, among it’s many gardens, The Harper Collection, a collection of some 600 specimens of rare and dwarf conifers. Of course, conifers are trees that bear cones, what we commonly refer to as pine cones, although pines are just one of the many types of conifers.
In a fascinating, and all too brief presentation, John explained to us about “Witches Brooms,” which are dense clusters of twigs or thickened stems that develop on the branches of woody trees.
These clusters of stems, contain genetically mutated branches, which, when propagated are a new plant, with DNA different from the tree where they were originally growing.
John dedicates his weekends at Hidden Lake Gardens, to locating, studying, developing, propagating and preserving these newly discovered and rare varieties of trees.
As he explained to us, in order to preserve these new species, a slip of the “broom” is taken and grafted on to a seedling of a tree of the same genus (so a spruce to a spruce, a fir to a fir, a pine to a pine, etc.)
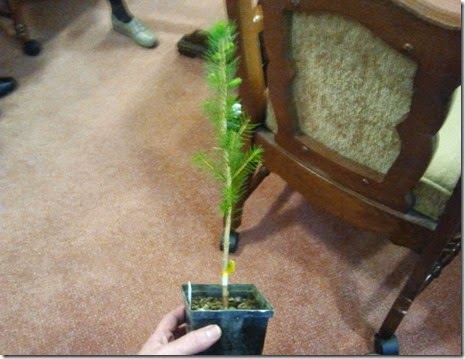
This slip was taken from a “Broom” growing on a spruce tree, so it has been grafted onto a young Norway Spruce seedling. John indicated that Norway Spruce is used because they are readily available and relatively inexpensive.
When the graft starts to show new growth, he knows it has successfully joined with the root stock or scion. Then, when the graft become strong and healthy enough, the top of the Norway Spruce will be cut away, leaving him with a chimera, an organism with more than one individual sets of DNA. As the tree mature, and gets strong enough, cuttings can be taken from the new growth and rooted, creating a tree that is genetically independent of both the original host and the interim scion.
Although this process can be described in just a few sentences, in fact it can take many years.
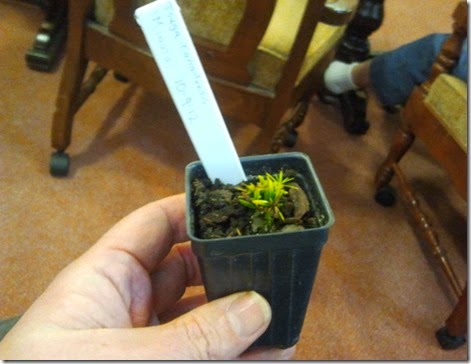
These are generally slow growing trees, . Many of the varieties of rare trees in the collection grow from 1/2” to 3” per year, so it could take up to 24 years to grow a tree a foot tall. In fact this miniature hemlock tree is over two years old and slightly over 1” tall.
John speculates that some of his trees that he is just starting now will barely be big enough to be transplanted years from now when he retires. It is clearly a work of passion and dedication, and not one motivated or driven by profit.
This wonderful presentation ended with an invitation to visit Hidden Gardens and tour the many different collections housed there.
Sunday, March 23, 2014
How To Start Prepping Your Gardens
Hi everyone!
Are you ready for Spring? Ready to get out in the Garden? I know we here at DTL Herbs are! Now that the snow is beginning to finally melt I am excited about the new season and getting our herb beds and flower beds around our home ready and prepped.
We are getting ready to embark on an exciting, crazy and busy new level of our business, DTL Herbs. As most of you know, we have a contract at a local well established farm for some land. This also includes having access to existing greenhouses and the opportunity for hoop houses.
We have already planted a couple of thousand herb plants and plan to get more growing. We also are adding many heirloom vegetables and fruits to our planting schedule. Yup, BIG plans for just the two of us!!
Right now with the weather still not warm enough for planting, we are taking advantage of this decent weather to get our own yard prepped for Spring. Fortunately we have mostly perennial herbs and flowers planted here at home. We really have no extra time during the summer to spend energy in our home gardens. Every ounce of energy and time we have goes right into our business.
So, home garden prepping has begun around our little homestead!
I came across this article from The Home Depot (no we have no affiliation with HD). It’s a simple article about “Getting your garden prepped” and thought I would share it.
CLEAN UP
Start your garden prep by cleaning and tidying up your beds. But don’t rush the season. You can do more harm than good if you walk around in your garden while the ground is soggy or icy. Walking around now will compact the soil, making it difficult for plant roots to penetrate, and digging will leave clods of dirt you’ll struggle to break apart.
When the soil is dry enough, pull up any dead annuals or vegetables still standing in the garden. Also prune or cut back perennials and ornamental grasses to encourage vigorous, healthy, new growth.
Toss the debris in your compost pile, unless you see signs of pests or diseases. If you do, trash the plant parts to avoid spreading problems.
Remove any grass, rocks, weeds and twigs from your planting spot. Weeds can re-sprout from chopped-up roots, so be as thorough as you can.
DIG IN
Now you’re ready to dig in. Loosen the soil by digging or tilling 6 to 8 inches deep. Dig or till up to 12 inches deep for root crops like carrots and potatoes, or plan to grow them in hills, which are flat-topped mounds of loose soil. Root crops will also thrive in raised beds filled with lots of good soil and organic matter.
AMEND
If you didn’t test your soil last fall, you can still do so now. Use a home test kit or send a soil sample to your county extension service. Then add any lime, garden sulfur or nutrients the test recommends. A fall application gives amendments more time to meld with your native soil, but they’ll help improve your garden even if you’re adding them now.
Also add lots of good organic matter to your garden bed, such as shredded leaves, compost, and / or dehydrated manure. Organic materials loosen the soil’s structure, improving drainage and allowing roots to penetrate more easily. Turn your amendments and organic matter into the loosened soil, so everything is mixed together.
MULCH
Top off your bed by mulching it with several inches of organic matter.
PREPPING A RAISED BED
If you’ve never gardened in a raised bed, it’s easy to assemble one from a kit. If you’re prepping a raised bed you’ve used before, top it off with more soil, if needed, and mix in any amendments as indicated by a soil test. Finish by mulching the raised bed with a few inches of organic matter.
MAKE A LIST
Before you plant, make a list of plants you want to grow. Be sure to shop early, since many popular varieties sell out fast. Jot down any seed starting supplies you need, too, such as peat pots, trays or seed starting mix. Consider using some grow lights if you’re starting a lot of seeds indoors or if you don’t get enough bright light from your windows. You may also want to invest in a seed propagating heat mat, which supplies gentle heat underneath your pots or trays to help plant roots develop faster.
Check your seed packets when you buy them, and mark the dates to start your seeds on a calendar. You — and your garden beds — will be ready to go when spring arrives.
Source: The Home Depot
Have you started prepping your gardens yet? Have you decided on adding anything new?
Remember, you can purchase our products at our online store: DTL Herbs
Friday, February 28, 2014
Feedback Friday #2
Hi Everyone, and welcome to Feedback Friday.
Feedback Friday is a feature where our customers have a chance to share their experiences with our products.
If you would like to write a post of Feedback Friday, and be featured on our blog, just drop us an email, and we will schedule a date for your post.
Todays post was written by Karen Burke, a food preservation specialist and master gardener from Macomb County Michigan.
Here’s what Karen wrote:
Hello everyone! Karen Burke here.
I would like to let all of you know how I use DTL Herbs. I currently teach dehydrating classes and use the "Herbed Salt" on zucchini slices.
This is a favorite class snack that I make for them to sample (In season). What I do is slice the zucchini 1/4" thick and shake the "Herbed Salt" on top, one side only.
I then dehydrate at 115° F until they are dry. (Approximately 8 hours depending on how humid it is)
These make a wonderful and healthy substitute for commercially processed potato chips.
You may also want to try their "Chive and Dill Vegi Dip" to dip the chips in!
I have been using their "Herbed Salt" on my own zucchini chips for over 3 years now and everyone loves them.
I no longer "drop and run" zucchini off at anyone’s house. In fact I actually grow MORE zucchini!
Next month (March) I will be trying their "Hunter's Blend Dry Rub" on meat to make jerky. I'll let you know how it turns out!
Thank you Karen for sharing your experience with us!
.
Friday, February 14, 2014
Feedback Friday #1
Hi everyone!
Welcome to our first “Feedback Friday”! We hope to to feature this a couple times each month.
What is Feedback Friday? It is post written by one of our DTL Herbs customers. The customer will share with us all how they use one or more of our products.
If you would like to write a post, just drop us an email and we will be glad to answer any questions you have!
Now, I would like to introduce to you Lorie, a customer from one of our Farmer’s Markets.
Now, here’s Lorie…
We continually hear what chemicals are added to food. For instance, margarine is a few molecules away from plastic. A fast food chain has decided to remove a harmful chemical that they add to their "fresh bread". A red slime was previously added to fast food burgers, of course it was labeled as safe for human consumption. MSG has been linked to Chinese food menus and I'm sure other menus.
We eat foods that have been labeled as GMO, which is defined as,
Genetically modified organism (GMO) an organism whose genetic material has been altered using genetic engineering techniques.
My son asked me, "why do they have to add all that junk to the foods we eat." I'm a Registered Nurse and a Certified Herbalist. I'm convinced that our poor health conditions in this country are a result of the chemicals that exist in our foods.
Thomas Edison said, "the doctor of the future will give no medicine, but will interest his patients in the care and prevention of disease."
Hypocrites, Greek Physician and Herbalist, Father of Medicine said, "Let your medicine be your food and your food be your medicine."
I was introduced to this fantastic small business, DTL Herbs, 3 years ago. Their attention to growing and harvesting herbs free from chemicals and pesticides is exactly what I look for in products. The research and development of herbal combinations is amazing. When shopping during the "warm" months at Farmer Markets where DTL Herbs sells merchandise, their fragrant herbs are intoxicating and freshness is apparent.
Many people are nervous in using herbs to cook. DTL Herbs has taken out any guess work when it comes to using the dried herbs. The combination of herbs is perfectly incorporated to produce a taste explosion that cannot be produced by store bought products. Herbs not only provide great tasting foods but also make your food healthy.
I enjoy making Chicken Soup loaded with fresh vegetables and I add, DTL Herbs (and all naturally dried, and grown, peppers from another local business The Garden Hoard).
I add All Purpose Seasoning Blend, to my soup the last 45 minutes of the simmering stage. The smells coming from the stove, a warm bowl of soup, during a furious winter snowstorm are more than I can wait for completion.
I have never been disappointed in products purchased from DTL Herbs. Be adventurous, cook with herbs. Be healthier and get rid of the chemicals in your food. DTL Herbs is my choice for my food.
Thank you Lorie for sharing with us and for being such a wonderful DTL Herb customer!